[오리엔테이션] 실습목표 및 사전실습 안내
실습 목표 : 티처블 머신 AI 모델을 라즈베리파이 피코와 웹에서 연동하기
실습 구조 : 티처블머신 AI 모델 -> 웹사이트 연동 -> 파이어베이스 연동 -> 라즈베리파이 피코 연동 -> RGB LED 제어

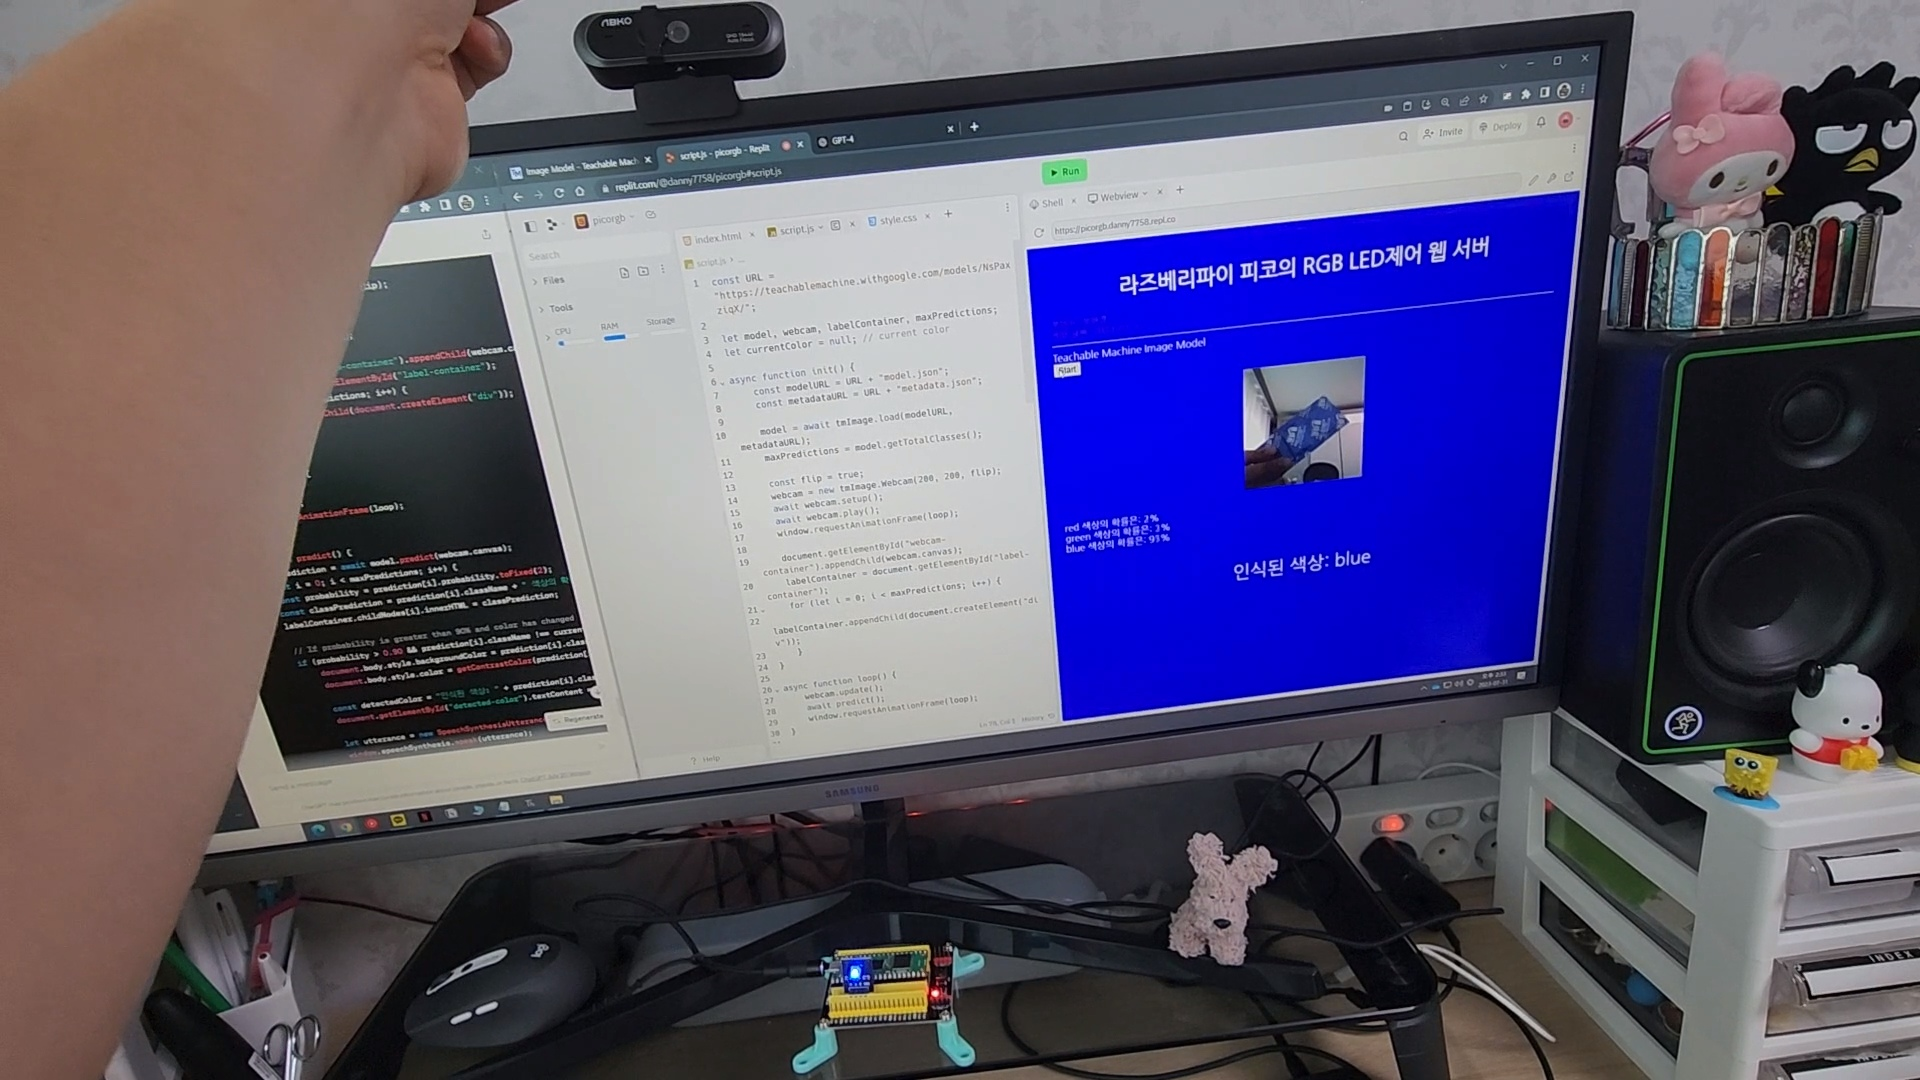
* 사전 실습 내용 확인 할 것.
라즈베리파이 피코 w의 LED 웹서버 제어(feat.구글 파이어베이스)
포스팅을 시작하기 이전에 라즈베리파이 피코, 파이어베이스 운영에 대한 자료 출처는 모두 김주현 장학사(서울시교육청)님께 받았음을 밝힙니다. 자료 출처 깃헙 레포짓 : https://github.com/mtinet/s
pythonkorea.com
[실습 1] 라즈베리파이 피코 RGB LED 회로 제어하기(feat. ChatGPT)
1단계. RGB LED 회로 구축
- RGB LED는 3개의 R,G,B 제어핀과, 1개의 GND 핀으로 총 4개의 핀이 있다.

그림 출처 :
https://projects.raspberrypi.org/en/projects/introduction-to-the-pico/8
https://projects.raspberrypi.org/en/projects/introduction-to-the-pico/8
projects.raspberrypi.org
내가 가진 RGB LED 모듈에는 저항이 내장되어 있어서 냅다 피코 쉴드에 꼿아서 사용 할수 있다.

red pin - GP3
green pin - GP4
blue pin - GP5
gnd pin - GND
2단계. RGB LED 기본제어
ChatGPT에게 기본 코드를 작성해 달라고 했다.

이 코드를 사용할때는 핀번호는 내 가 구축한 회로랑 맞춰서 바꿔서 써야 한다.
from machine import Pin, PWM
import time

# RGB LED에 연결된 GPIO 핀 설정
red = PWM(Pin(3)) #내가 연결한 것으로 변경 필요
green = PWM(Pin(4)) #내가 연결한 것으로 변경 필요
blue = PWM(Pin(5)) #내가 연결한 것으로 변경 필요

# PWM 주파수 설정
red.freq(1000)
green.freq(1000)
blue.freq(1000)

# 색상을 조정하는 함수
def set_color(r, g, b):
    red.duty_u16(r)
    green.duty_u16(g)
    blue.duty_u16(b)

# 주요 색상 사이를 부드럽게 전환
while True:
    # 빨간색에서 파란색으로 전환
    for i in range(0, 65535, 1000):
        set_color(65535-i, 0, i)
        time.sleep(0.01)

    # 파란색에서 초록색으로 전환
    for i in range(0, 65535, 1000):
        set_color(0, i, 65535-i)
        time.sleep(0.01)

    # 초록색에서 빨간색으로 전환
    for i in range(0, 65535, 1000):
        set_color(i, 65535-i, 0)
        time.sleep(0.01)
동작확인
3단계. RGB LED 입력 변수로 제어
이번에는 r,g,b를 입력하면 특정 생상이 켜지도록 코드를 작성해달라고 부탁했다.
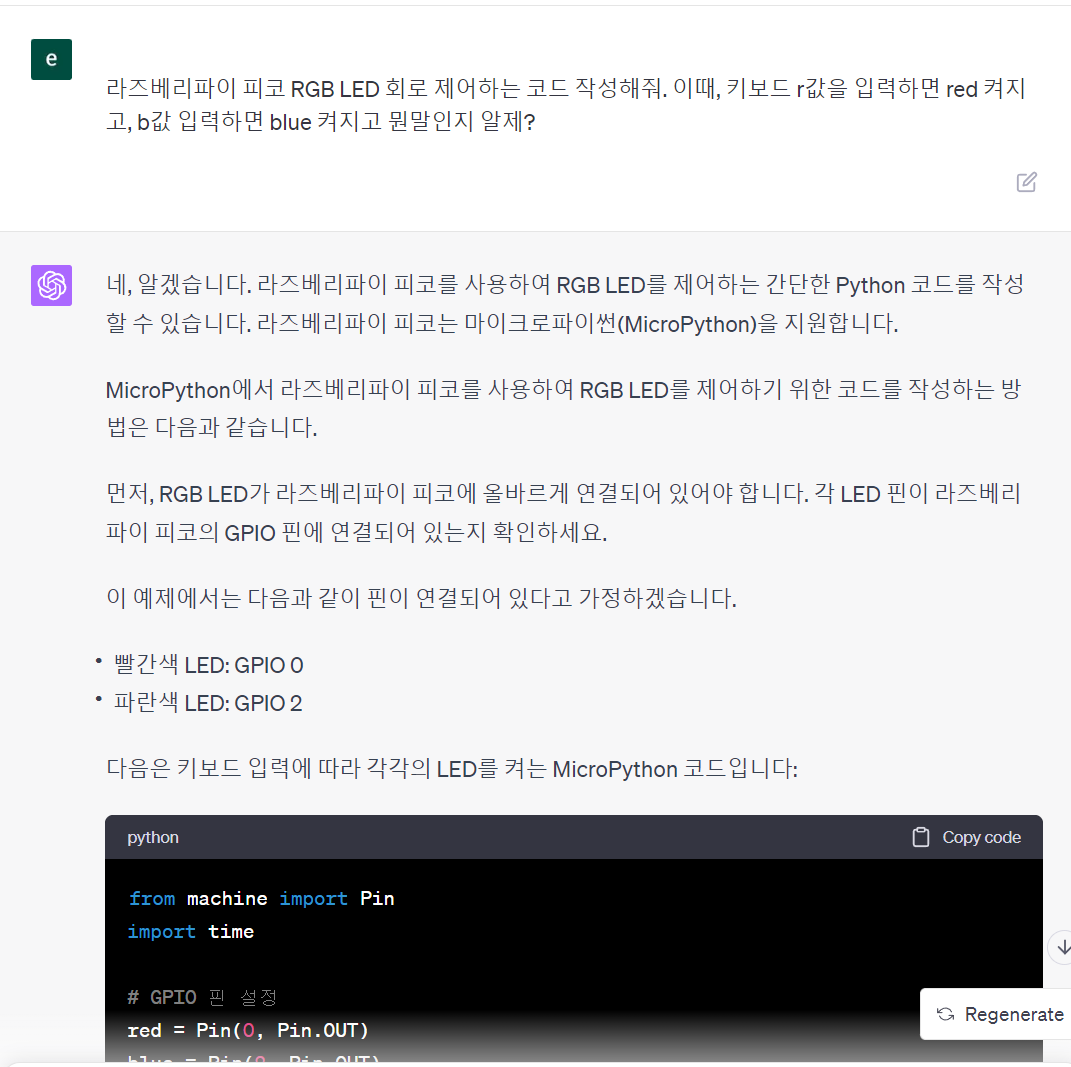
마찬가지로 핀번호만 맞춰서 사용해준다.
from machine import Pin
import time

# RGB LED에 연결된 GPIO 핀 설정
red = Pin(3, Pin.OUT)
green = Pin(4, Pin.OUT)
blue = Pin(5, Pin.OUT)

# 초기에는 모든 LED를 끔
red.value(0)
green.value(0)
blue.value(0)

# 키보드 입력을 받음
while True:
    x = input("Enter 'r' for red, 'g' for green, 'b' for blue, 'q' to quit: ")

    # 빨간색 LED 제어
    if x == 'r':
        red.value(1)
        green.value(0)
        blue.value(0)

    # 초록색 LED 제어
    elif x == 'g':
        red.value(0)
        green.value(1)
        blue.value(0)

    # 파란색 LED 제어
    elif x == 'b':
        red.value(0)
        green.value(0)
        blue.value(1)

    # 종료
    elif x == 'q':
        break

    else:
        print("Invalid input. Please enter 'r', 'g', 'b', or 'q'.")

    time.sleep(0.5)

# 모든 LED를 끔
red.value(0)
green.value(0)
blue.value(0)
아래와 같이 피코에 코드를 그대로 업로드 해준다.

동작확인
라즈베리파이 피코 RGB LED 제어 코드 GPT 질문 전문 공유
ChatGPT
A conversational AI system that listens, learns, and challenges
chat.openai.com
이 외에도 1~9 까지 번호에 색을 지정해서 다양한 색을 볼 수 도 있다.
[실습 2] 색 인식 AI 웹 사이트 만들기(feat.Teachable Machine, Replit)
티처블 머신은 AI를 훈련시키고 모델을 내보내 주기 때문에 아두이노, 웹, 라즈베리파이 같은 다양한 플랫폼과 연동해서 프로젝트를 제작할 수 있다.
티처블 머신 연동 AI 웹 예시

https://bossycompatiblesubversion.kimten0226.repl.co/
마스크 판독기
마스크 판독기 제작자 : 김태은 / 2021.06.02 Start !
bossycompatiblesubversion.kimten0226.repl.co
처음 써보시는 분들은 아래 자료를 통해 내용을 확인 할 수 있다.
기존 강의 자료 참고 (아래 그림 클릭)
1단계. 티처블 머신 색 인식 AI 모델 훈련 및 내보내기
RGB LED에 색을 표현 할수 있게 R, G, B 3가지 색상을 학습시킨다.

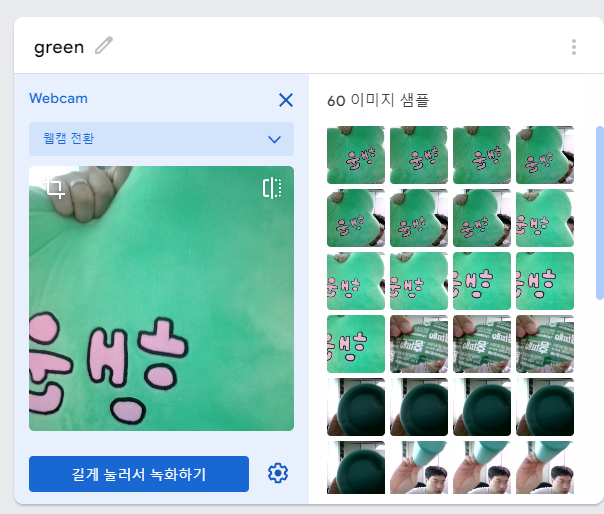

훈련을 해보고 테스트를 해본다.
( 나는 다 해보고 느낀건데, 여기에 아무것도 인식 안하는 경우도 학습을 시켜서 인식 안할 때 도 나타내서 총 4가지 클래스로 구분하면 더 좋을 것 같다.)
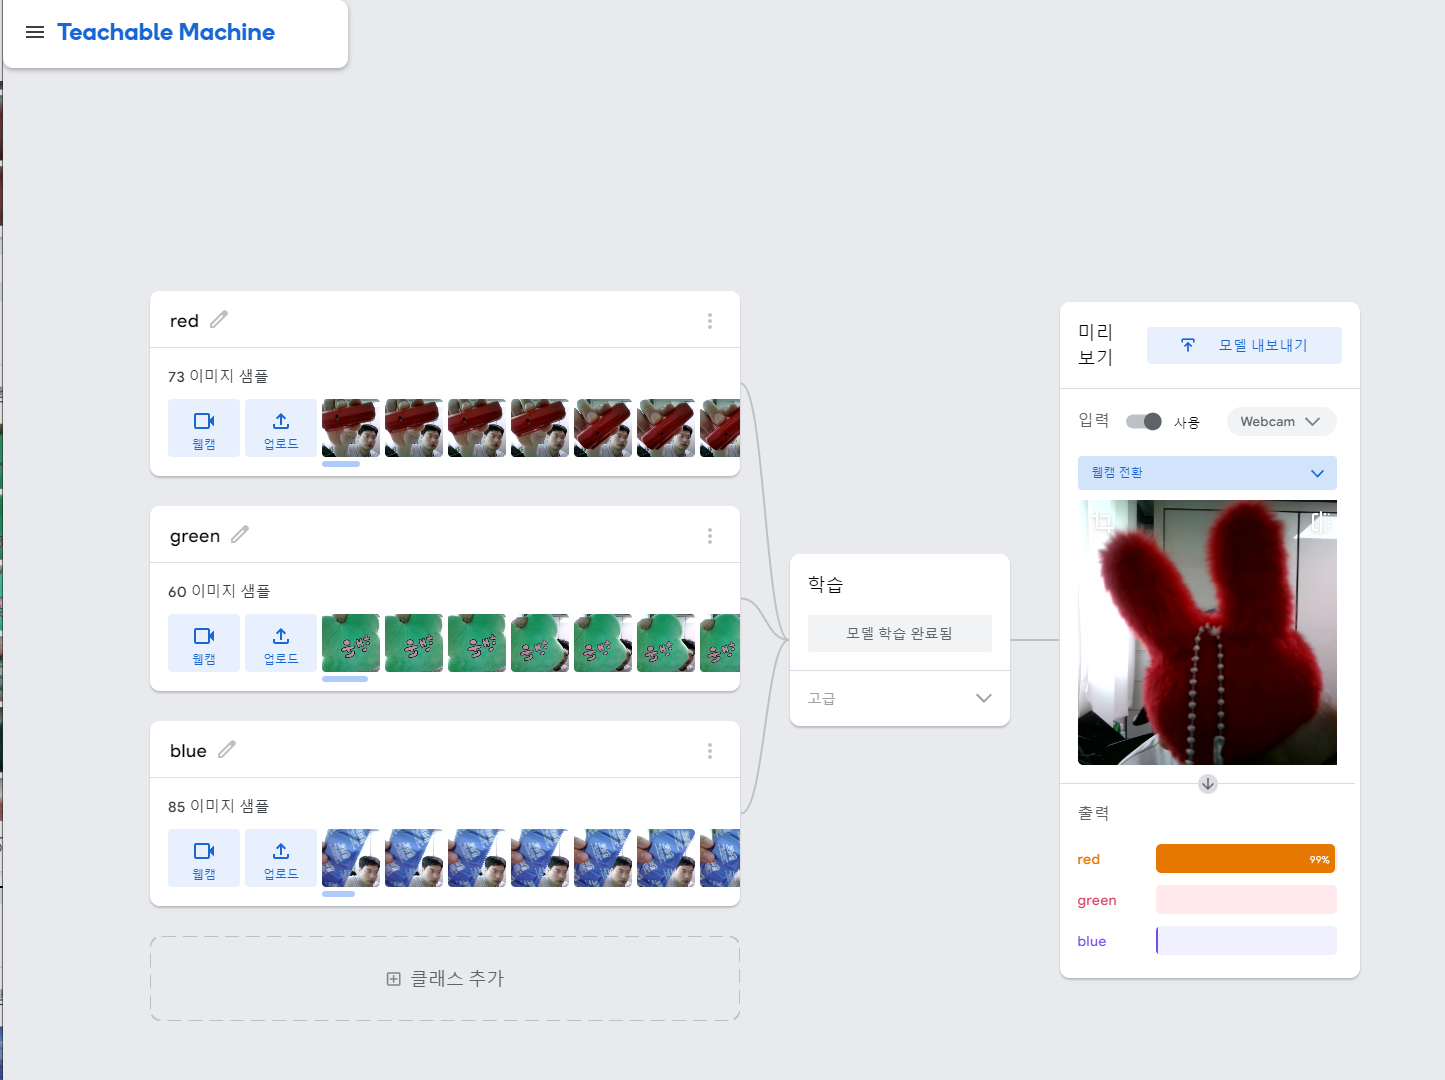
모델이 잘 작동 되면 아래 순서대로 모델을 내보낸다.

자바스크립트로 구성된 티처블 머신의 AI 코드는 다음과 같다.
<div>Teachable Machine Image Model</div>
<button type="button" onclick="init()">Start</button>
<div id="webcam-container"></div>
<div id="label-container"></div>
<script src="https://cdn.jsdelivr.net/npm/@tensorflow/tfjs@latest/dist/tf.min.js"></script>
<script src="https://cdn.jsdelivr.net/npm/@teachablemachine/image@latest/dist/teachablemachine-image.min.js"></script>
<script type="text/javascript">
    // More API functions here:
    // https://github.com/googlecreativelab/teachablemachine-community/tree/master/libraries/image

    // the link to your model provided by Teachable Machine export panel
    const URL = "https://teachablemachine.withgoogle.com/models/NsPaxziqX/";

    let model, webcam, labelContainer, maxPredictions;

    // Load the image model and setup the webcam
    async function init() {
        const modelURL = URL + "model.json";
        const metadataURL = URL + "metadata.json";

        // load the model and metadata
        // Refer to tmImage.loadFromFiles() in the API to support files from a file picker
        // or files from your local hard drive
        // Note: the pose library adds "tmImage" object to your window (window.tmImage)
        model = await tmImage.load(modelURL, metadataURL);
        maxPredictions = model.getTotalClasses();

        // Convenience function to setup a webcam
        const flip = true; // whether to flip the webcam
        webcam = new tmImage.Webcam(200, 200, flip); // width, height, flip
        await webcam.setup(); // request access to the webcam
        await webcam.play();
        window.requestAnimationFrame(loop);

        // append elements to the DOM
        document.getElementById("webcam-container").appendChild(webcam.canvas);
        labelContainer = document.getElementById("label-container");
        for (let i = 0; i < maxPredictions; i++) { // and class labels
            labelContainer.appendChild(document.createElement("div"));
        }
    }

    async function loop() {
        webcam.update(); // update the webcam frame
        await predict();
        window.requestAnimationFrame(loop);
    }

    // run the webcam image through the image model
    async function predict() {
        // predict can take in an image, video or canvas html element
        const prediction = await model.predict(webcam.canvas);
        for (let i = 0; i < maxPredictions; i++) {
            const classPrediction =
                prediction[i].className + ": " + prediction[i].probability.toFixed(2);
            labelContainer.childNodes[i].innerHTML = classPrediction;
        }
    }
</script>
코드의 대략적인 분석은 아래와 같다.
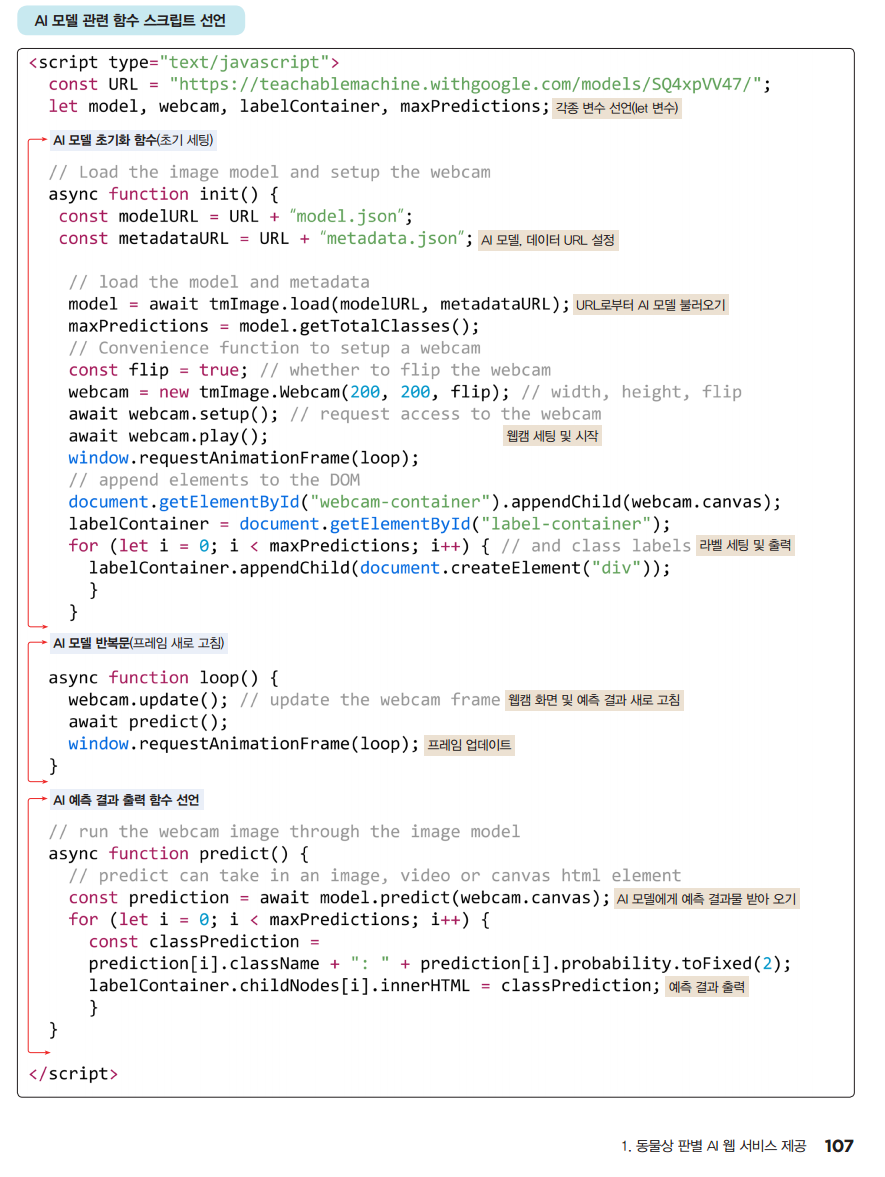
위 내용은 인공지능과 메이커프로젝트 본문에서 발췌한 것이다. 해당 교과서는 아래에서 다운 받을 수 있다.
인공지능과 메이커 프로젝트 교과서 다운로드
2023년 3월에 서울시교육청에서 출간한 인공지능과 메이커프로젝트 교과서 pdf 공유합니다. AI 융합연구회 선생님들과 함께 집필하였습니다. 전문교과2 과목으로 개설하였고, 인공지능 메이커 교
pythonkorea.com
2단계. Replit을 활용한 색 인식 AI 웹사이트 구축
레플릿에 접속하여 웹사이트 구축을 해보자.
Sign Up
Run code live in your browser. Write and run code in 50+ languages online with Replit, a powerful IDE, compiler, & interpreter.
replit.com
템플릿 생성
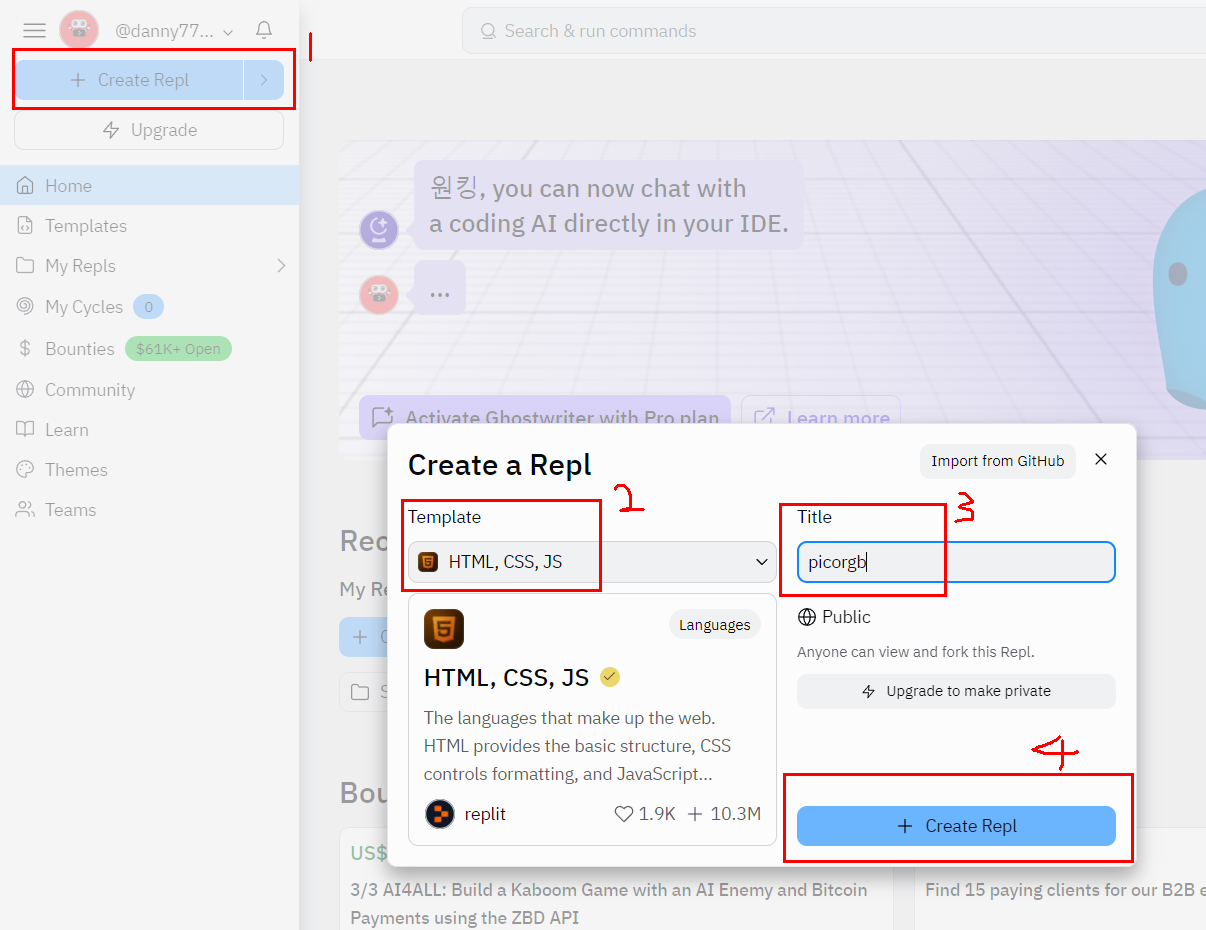
불필요한 코드는 삭제하고 시작한다.

티처블 머신에서 가져온 AI 모델 코드를 냅다 <BODY> 태그 안에 복붙 해준다.

우선은 동작으로 테스트 해보자.

렛플릿에서 잘 동작한다.

3단계. CHATGPT를 통해 색 인식 AI 웹사이트 CSS 꾸미기
chat gpt에게 질문을 잘 던지면 홈페이지를 내 스타일 대로 바꿀 수 있다. 기존코드를 주고 구체적인 요구사항을 말했다.


아래는 질문 전문이다. 아래 질문내용을 확인하여, gpt로 웹개발이 어떻게 이루어지는지 확인해 보자.
https://chat.openai.com/share/5a6da3bb-5f96-481a-8683-9dfc7a58715c
ChatGPT
A conversational AI system that listens, learns, and challenges
chat.openai.com
GPT가 만들어준 최종 코드들
index.html
<!DOCTYPE html>
<html>

<head>
  <meta charset="utf-8">
  <meta name="viewport" content="width=device-width">
  <title>라즈베리파이 피코의 RGB LED제어 웹 서버</title>
  <link href="https://fonts.googleapis.com/css2?family=Nanum+Gothic&display=swap" rel="stylesheet">
  <link href="style.css" rel="stylesheet" type="text/css" />
</head>

<body>
  <h1>라즈베리파이 피코의 RGB LED제어 웹 서버</h1>
  <div class="meta-info">작성자: 성원경</div>
  <div class="meta-info">작성 날짜: 2023-07-31</div>
  <hr>
  <div>Teachable Machine Image Model</div>
  <button type="button" id="start-button">Start</button>
  <div id="webcam-container"></div>
  <div id="label-container"></div>
  <div id="detected-color" class="detected-color"></div>
  <script src="https://cdn.jsdelivr.net/npm/@tensorflow/tfjs@latest/dist/tf.min.js"></script>
  <script src="https://cdn.jsdelivr.net/npm/@teachablemachine/image@latest/dist/teachablemachine-image.min.js"></script>
  <script src="script.js"></script>
</body>

</html>
style.css
body {
  font-family: 'Nanum Gothic', sans-serif;
  padding: 20px;
  background-color: #f0f0f0;
}

h1 {
  text-align: center;
}

.meta-info {
  font-size: 0.9em;
  color: #666;
}

#webcam-container {
  position: relative;
  height: 200px;
  width: 200px;
  margin: 20px auto;
}

#label-container {
  margin-top: 20px;
}

.detected-color {
  font-size: 2em;
  width: 50%;
  margin: 50px auto;
  text-align: center;
}
script.js
const URL = "https://teachablemachine.withgoogle.com/models/NsPaxziqX/";

let model, webcam, labelContainer, maxPredictions;
let currentColor = null; // current color

async function init() {
    const modelURL = URL + "model.json";
    const metadataURL = URL + "metadata.json";

    model = await tmImage.load(modelURL, metadataURL);
    maxPredictions = model.getTotalClasses();

    const flip = true;
    webcam = new tmImage.Webcam(200, 200, flip);
    await webcam.setup();
    await webcam.play();
    window.requestAnimationFrame(loop);

    document.getElementById("webcam-container").appendChild(webcam.canvas);
    labelContainer = document.getElementById("label-container");
    for (let i = 0; i < maxPredictions; i++) {
        labelContainer.appendChild(document.createElement("div"));
    }
}

async function loop() {
    webcam.update();
    await predict();
    window.requestAnimationFrame(loop);
}

async function predict() {
    const prediction = await model.predict(webcam.canvas);
    for (let i = 0; i < maxPredictions; i++) {
        const probability = prediction[i].probability.toFixed(2);
        const classPrediction = prediction[i].className + " 색상의 확률은: " + (probability*100) + "%";
        labelContainer.childNodes[i].innerHTML = classPrediction;

        if (probability > 0.90 && prediction[i].className !== currentColor) {
            document.body.style.backgroundColor = prediction[i].className;
            document.body.style.color = getContrastColor(prediction[i].className);
            const detectedColor = "인식된 색상: " + prediction[i].className;
            document.getElementById("detected-color").textContent = detectedColor;

            let utterance = new SpeechSynthesisUtterance(detectedColor);
            window.speechSynthesis.speak(utterance);

            currentColor = prediction[i].className;
        }
    }

    if (currentColor == null) {
        document.body.style.backgroundColor = 'gray';
        document.body.style.color = 'white';
        document.getElementById("detected-color").textContent = "인식 중...";
    }
}

function getContrastColor(color) {
    var rgb = getRGBColor(color);
    var o = Math.round(((parseInt(rgb[0]) * 299) + (parseInt(rgb[1]) * 587) + (parseInt(rgb[2]) * 114)) / 1000);
    return (o > 125) ? 'black' : 'white';
}

function getRGBColor(colorName) {
    var dummy = document.createElement("div");
    dummy.style.color = colorName;
    document.body.appendChild(dummy);

    var color = window.getComputedStyle(dummy).color;

    document.body.removeChild(dummy);

    return color.match(/\d+/g);
}

document.getElementById("start-button").addEventListener('click', init);
요청에 요청을 거듭해서, 내가 원하는 형태로 바꾸었다.

- 글씨체, 색상, 레이아웃을 바꾸고
- 인식 결과 출력 문구를 바꾸고
- TTS를 추가하여 스피커로 인식결과를 출력하게 하였다.
결과물을 확인해보자.
여러분들도 본인 스타일대로 수정해 보자.
나같은 경우에는 위 결과물에서 색깔이 튈때 를 대비하고, 약 1초 정도 인식 후 기다렸다가 인식결과 말해주고, 색 인식을 안할때 배경을만 인식할때 따로 구분짓고 싶긴한데 다음 스텝을 위해 여기서 stop 하겠다.
[실습 3] 파이어베이스 Realtime database와 AI웹사이트 연동하기
https://firebase.google.com/?hl=ko
Firebase | Google’s Mobile and Web App Development Platform
Discover Firebase, Google’s mobile and web app development platform that helps developers build apps and games that users will love.
firebase.google.com
파이에베이스에 접속해서 데이터베이스를 연결하자.
기존에 만들어 두었던, 데이터베이스를 다시 쓰겠다. 규칙을 활성화 시킨다.

프로젝트 설정에서 config값을 복붙해 놓는다.
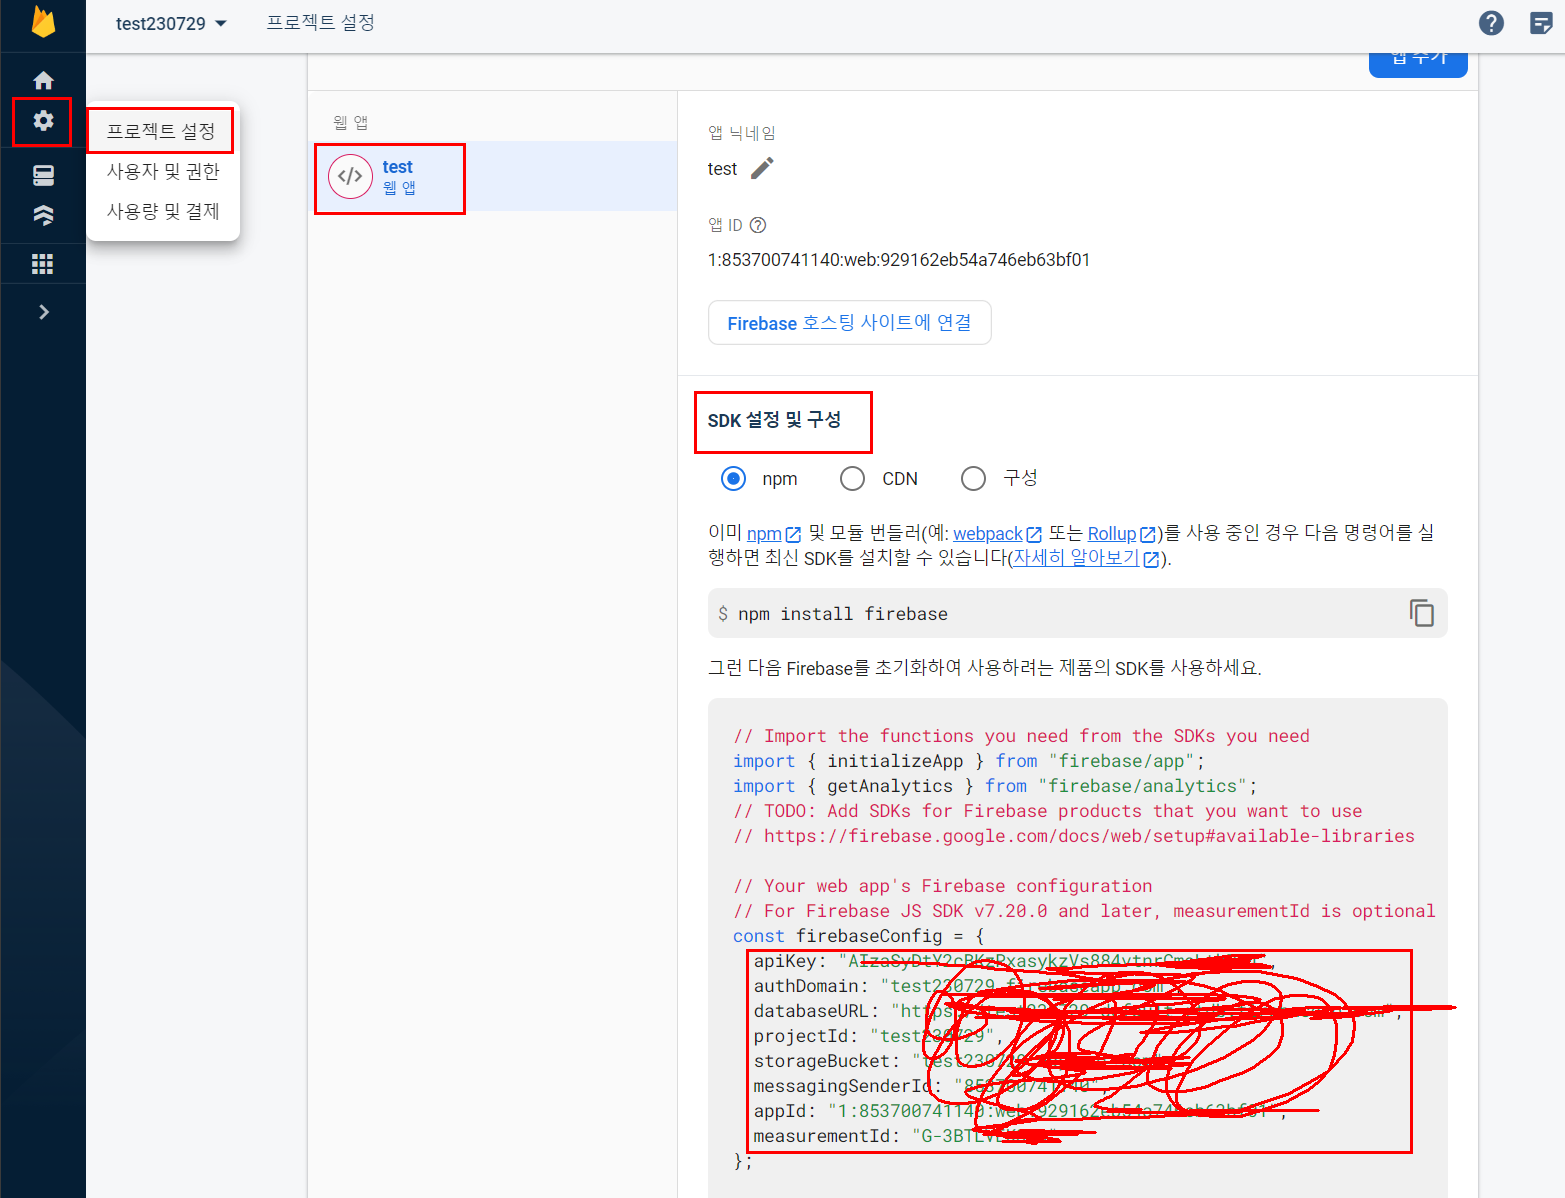
replit의 script.js에서 config값과 파이어베이스 데이터베이스를 연결한다.
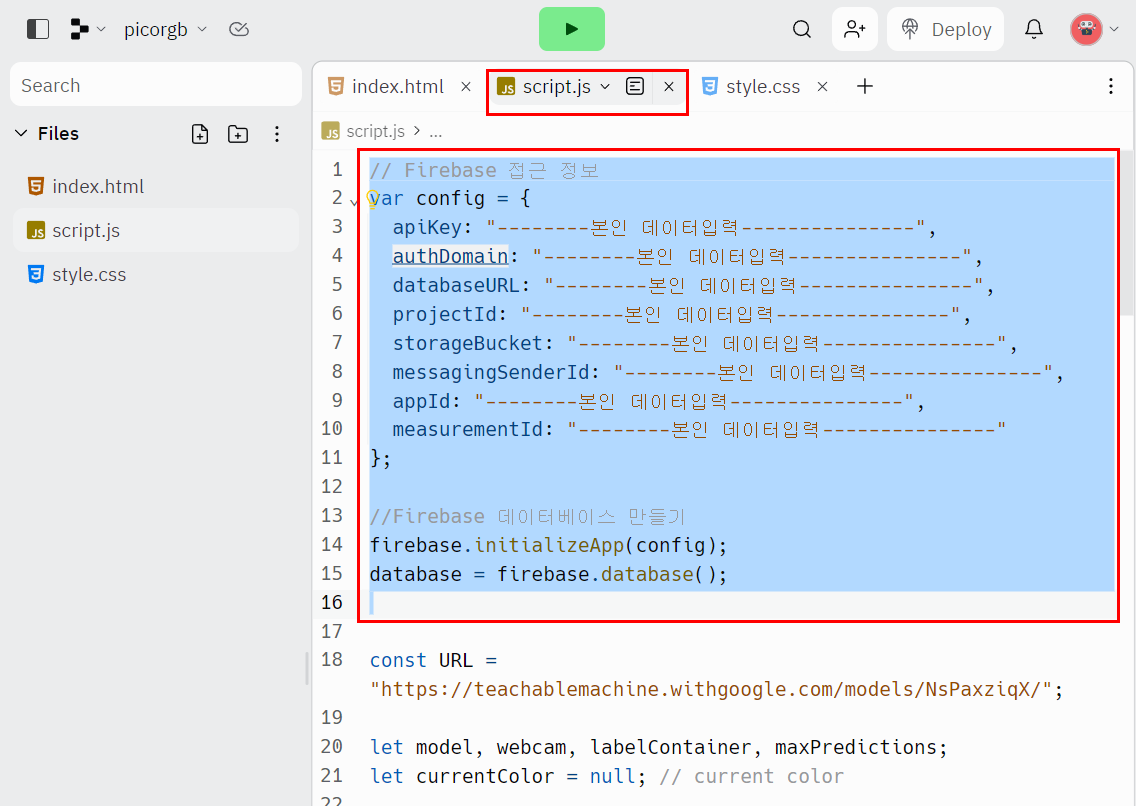
아래 코드에 본인 config값을 넣어서 쓴다.
// Firebase 접근 정보
var config = {
  apiKey: "--------본인 데이터입력---------------",
  authDomain: "--------본인 데이터입력---------------",
  databaseURL: "--------본인 데이터입력---------------",
  projectId: "--------본인 데이터입력---------------",
  storageBucket: "--------본인 데이터입력---------------",
  messagingSenderId: "--------본인 데이터입력---------------",
  appId: "--------본인 데이터입력---------------",
  measurementId: "--------본인 데이터입력---------------"
};

//Firebase 데이터베이스 만들기
firebase.initializeApp(config);
database = firebase.database();
그리고 티처블머신AI 모델이 인식결과를 나타내는 predict() 함수 안에 슬며시 파이어베이스 데이터 전송 코드를 아래와 같이 두줄 넣는다.

여기서 말하는 i는 90%이상 확률로 인식된 카테고리의 번호이다.
            var ref = database.ref('led');
            ref.update({ led: i })
그리고 index.html 코드에 파이어베이스 연동 코드를 한 줄 넣어준다.

<script src="https://www.gstatic.com/firebasejs/4.6.2/firebase.js"></script>
위 작업을 한뒤 인식 결과가 데이터베이스에 잘 전송되는지 확인한다.
카테고리 순서대로 Red : 0, Green : 1, Blue : 2 가 전송된다.

[실습 4] 파이어베이스 Realtime database와 라즈베리파이 피코 연동하기
이제 피코를 데이터베이스에 연동할 차례이다.
기존 피코 코드를 다시 살펴보며 동작 원리를 확인해 보자.
기존 main.py
from machine import Pin
import time

# RGB LED에 연결된 GPIO 핀 설정
red = Pin(3, Pin.OUT)
green = Pin(4, Pin.OUT)
blue = Pin(5, Pin.OUT)

# 초기에는 모든 LED를 끔
red.value(0)
green.value(0)
blue.value(0)

# 키보드 입력을 받음
while True:
    x = input("Enter 'r' for red, 'g' for green, 'b' for blue, 'q' to quit: ")

    # 빨간색 LED 제어
    if x == 'r':
        red.value(1)
        green.value(0)
        blue.value(0)

    # 초록색 LED 제어
    elif x == 'g':
        red.value(0)
        green.value(1)
        blue.value(0)

    # 파란색 LED 제어
    elif x == 'b':
        red.value(0)
        green.value(0)
        blue.value(1)

    # 종료
    elif x == 'q':
        break

    else:
        print("Invalid input. Please enter 'r', 'g', 'b', or 'q'.")

    time.sleep(0.5)

# 모든 LED를 끔
red.value(0)
green.value(0)
blue.value(0)
우리는 여기서 데이터베이스에서 데이터를 받아와서 받아온 데이터 대로 led를 활성화 해야 한다.
먼저 파이어베이스의 데이터베이스를 연결하는 코드를 앞부분에 넣어준다.
여기서 wifi 환경 부분과 url은 본인의 데이터베이스 주소를 넣어주어야 한다.

그리고 while문에서 데이터베이스에서 받아온 데이터로 if문을 구분해 준다.
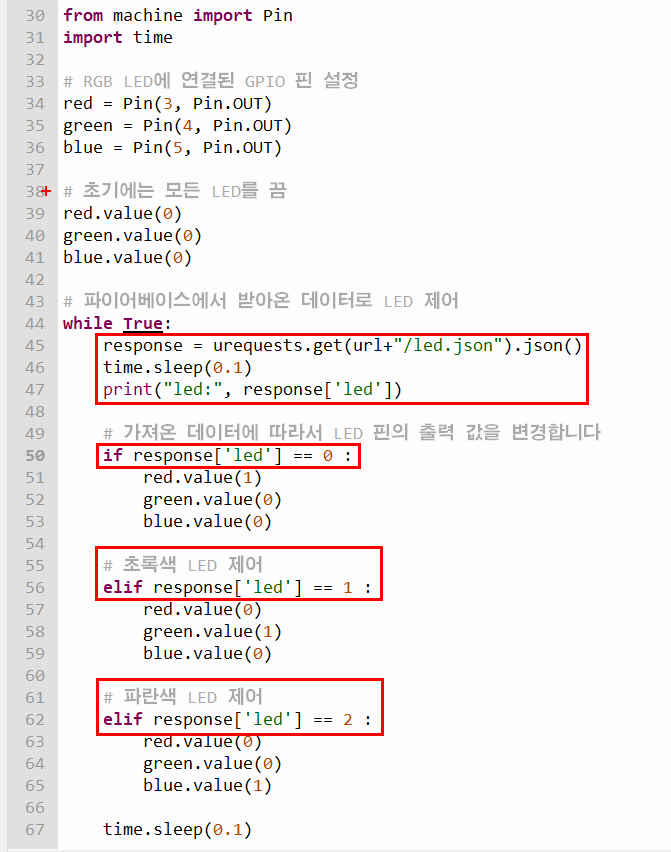
전체코드 : 수정된 main.py
from machine import Pin, PWM
import network
import time
import urequests
import random

# WLAN 객체를 생성하고, 무선 LAN을 활성화합니다
wlan = network.WLAN(network.STA_IF)
wlan.active(True)

# 와이파이에 연결합니다
if not wlan.isconnected():
    wlan.connect("His_Kigdom_1F_2.4Ghz", "wkgehome9093") #본인 와이파이 주소로 업데이트 할것
    print("Waiting for Wi-Fi connection", end="...")
    while not wlan.isconnected():
        print(".", end="")
        time.sleep(1)
else:
    print(wlan.ifconfig())
    print("WiFi is Connected")

# Firebase의 Realtime Database와 연결하기 위한 URL을 설정합니다
url = "https://test230729-default-rtdb.firebaseio.com" #본인의 데이터 베이스 주소 넣을 것

# 초기 상태를 설정하여 Firebase에 업데이트합니다
초기값 = {'led': 1,}
urequests.patch(url+"/led.json", json = 초기값).json()


from machine import Pin
import time

# RGB LED에 연결된 GPIO 핀 설정
red = Pin(3, Pin.OUT)
green = Pin(4, Pin.OUT)
blue = Pin(5, Pin.OUT)

# 초기에는 모든 LED를 끔
red.value(0)
green.value(0)
blue.value(0)

# 파이어베이스에서 받아온 데이터로 LED 제어
while True:
    response = urequests.get(url+"/led.json").json()
    time.sleep(0.1)
    print("led:", response['led'])

    # 가져온 데이터에 따라서 LED 핀의 출력 값을 변경합니다
    if response['led'] == 0 :
        red.value(1)
        green.value(0)
        blue.value(0)

    # 초록색 LED 제어
    elif response['led'] == 1 :
        red.value(0)
        green.value(1)
        blue.value(0)

    # 파란색 LED 제어
    elif response['led'] == 2 :
        red.value(0)
        green.value(0)
        blue.value(1)

    time.sleep(0.1)
그리고 동작을 확인해 보자.
아이패드에 웹사이트를 띄어서 동작을 구현했다.
추가 심화 과제.
1. 여러개의 디바이스간에 웹사이트 배경색 동기화
- 위 코드는 다양한 디바이스에서 배경 색을 동기화 하지는 않았다. 하지만 아래 코드를 조금 수정한다면, 다양한 디바이스간에 배경색을 동기화 할 수 있다.
[힌트코드]
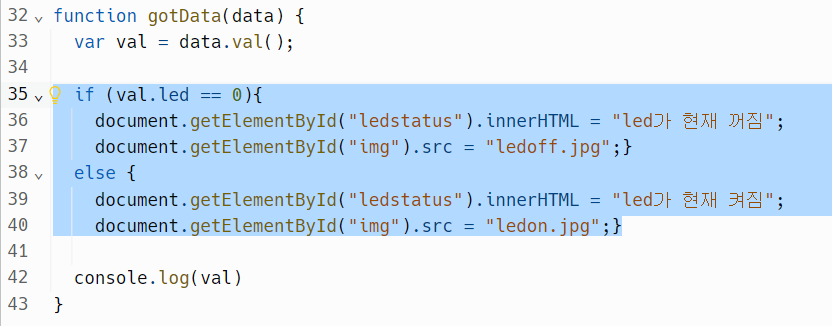
2. 티처블 머신 AI 모델이 인식하지 않고 대기 중일 때 신호 분류해서 그때의 상태 표현하기.
- 위 코드는 대기중일 때는 따로 표현하지 않았다. 하지만 실제 만들어 보니 대기중인 경우가 많아서 따로 AI 분류 를 구분해 두어서 표현하면 한층 더 동작이 안정적일 것이다.
끝.
@WonkingAIMakerClass2023
'메이커 프로젝트 > 라즈베리파이 피코' 카테고리의 다른 글
| 라즈베리파이 피코 블루투스 RC카 만들기(내장 통신모듈 이용 BLE) (2) | 2023.08.19 |
|---|---|
| 라즈베리파이 피코 + 음성인식 + 릴레이모듈 + 멀티탭 프로젝트 (0) | 2023.08.02 |
| 2023 서울시교육청 전문가연수 AI수업설계 교육과정 안내. (0) | 2023.08.01 |
| 라즈베리파이 피코 w의 LED 웹서버 제어(feat.구글 파이어베이스) (1) | 2023.07.29 |


