[강의 영상]
https://youtu.be/Ml5ZvstAGho
1. 아나콘다, vscode 설치
VSCode(Visual Studio Code) 사용법 - 파이썬/깃허브/아나콘다 연동
학습 목표 1. VScode의 기본 기능을 알고, 다양한 Extension 기능을 추가하여 다양한 기능을 활용할 수 있다. 2. Anaconda를 활용하여 특정 파이썬 버전과 필요한 라이브러리를 설치하여 가상환경을 생성
pythonkorea.com

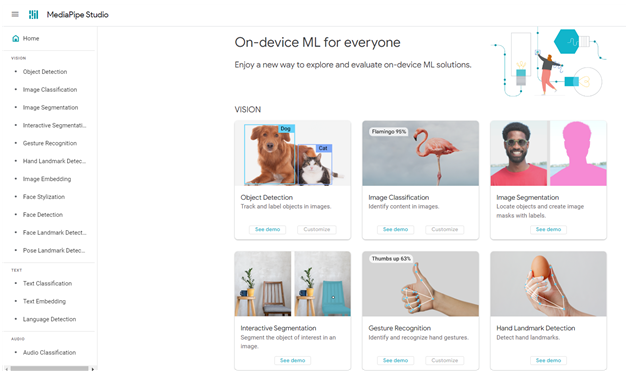
2. 미디어파이프 체험
- 미디어파이프
https://developers.google.com/mediapipe
MediaPipe | Google for Developers
An open source, cross-platform, customizable ML solution for live and streaming media.
developers.google.com

3. 미디어파이프 파이썬개발환경
https://chat.openai.com/share/30dddefb-f4a3-4db2-961a-d65e9bcc8a6a
ChatGPT
import cv2 import mediapipe as mp import pyautogui mp_face = mp.solutions.face_mesh face_mesh = mp_face.FaceMesh(min_detection_confidence=0.5, min_tracking_confidence=0.5) mp_drawing = mp.solutions.drawing_utils cap = cv2.VideoCapture(0) screen_width, scre
chat.openai.com

필요 라이브러리 설치
| pip install mediapipe opencv-python pyautogui |
지피티작성 미디어파이프 초기코드
import cv2
import mediapipe as mp
import pyautogui
# mediapipe 초기 설정
mp_face = mp.solutions.face_mesh
face_mesh = mp_face.FaceMesh(min_detection_confidence=0.5, min_tracking_confidence=0.5)
mp_drawing = mp.solutions.drawing_utils
cap = cv2.VideoCapture(0) # 웹캠 사용
screen_width, screen_height = pyautogui.size() # 화면의 크기
prev_x, prev_y =0, 0
try:
while cap.isOpened():
success, image = cap.read()
if not success:
print("Ignoring empty camera frame.")
continue
# RGB 변환
image_rgb = cv2.cvtColor(image, cv2.COLOR_BGR2RGB)
results = face_mesh.process(image_rgb)
if results.multi_face_landmarks:
for landmarks in results.multi_face_landmarks:
# 눈썹 위쪽 랜드마크 선택
x =int(landmarks.landmark[10].x * image.shape[1])
y =int(landmarks.landmark[10].y * image.shape[0])
# 마우스 움직임 감지
if prev_x and prev_y:
diff_x = x - prev_x
diff_y = y - prev_y
pyautogui.move(diff_x*3, diff_y*3)
prev_x, prev_y = x, y
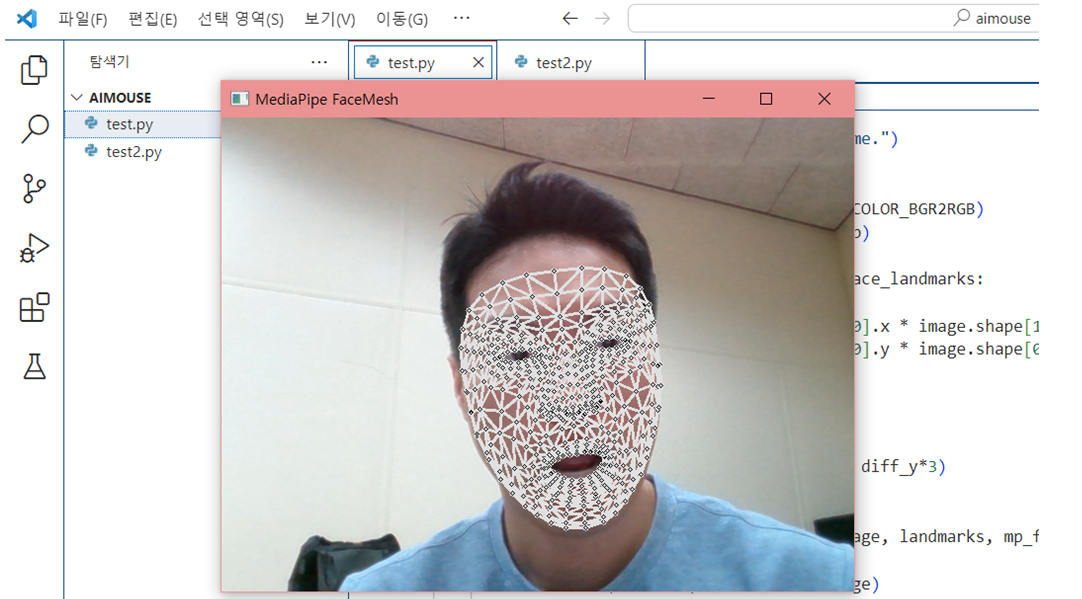
# 결과 보여주기
mp_drawing.draw_landmarks(image, landmarks, mp_face.FACEMESH_TESSELATION, landmark_drawing_spec=mp_drawing.DrawingSpec(color=(0, 0, 255)))
cv2.imshow('MediaPipe FaceMesh', image)
if cv2.waitKey(5) &0xFF ==27: # ESC 키로 종료
break
finally:
cap.release()
cv2.destroyAllWindows()vscode 파이썬 개발환경 구축

환경구축 터미널 코드
● 가상환경 생성 : conda create –n aimouse python=3.8
● 가상환경 구동 : conda activate aimouse
● 필요 라이브러리 설치
 pip install opencv-python
 pip install pyautogui
 pip install mediapipe
인터프리터 설정 : 단축키 ctrl + shift + p

기본 코드 구동
4. 미디어파이프 코드 최적화
챗지피티와 함께 코드 최적화 작업
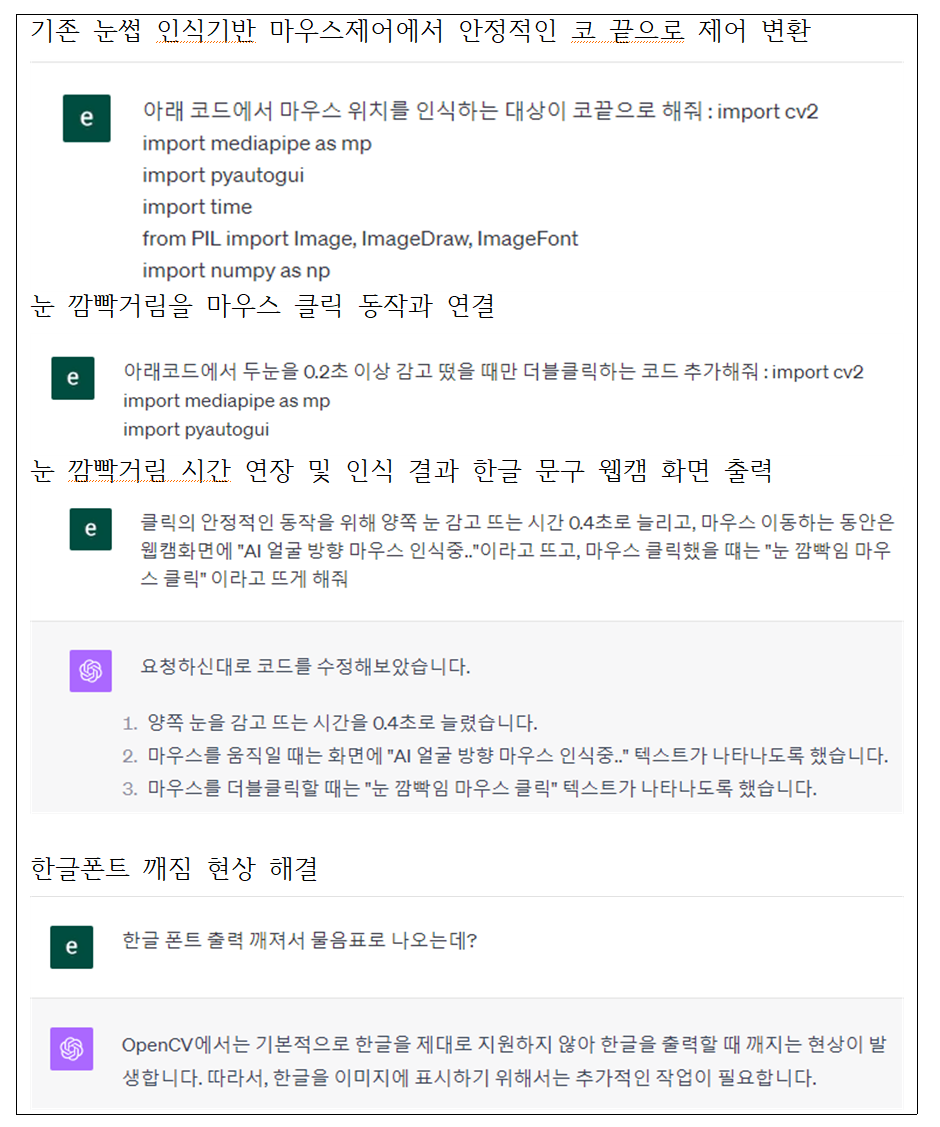
https://chat.openai.com/share/6cc9c636-cc10-4977-9594-fbaf5e1ae526
ChatGPT
import cv2 import mediapipe as mp import pyautogui import time from PIL import Image, ImageDraw, ImageFont import numpy as np def draw_korean_text(image, text, position, font_path, font_size, color, bg_color): image_pil = Image.fromarray(cv2.cvtColor(image
chat.openai.com
최종 최적화 코드
importcv2
importmediapipe as mp
importpyautogui
importtime
fromPIL importImage, ImageDraw, ImageFont
importnumpy asnp
# 한글 출력을 위한 함수
def draw_korean_text(image, text, position, font_path, font_size, color):
image_pil =Image.fromarray(cv2.cvtColor(image, cv2.COLOR_BGR2RGB))
draw =ImageDraw.Draw(image_pil)
font =ImageFont.truetype(font_path, font_size)
draw.text(position, text, font=font, fill=color)
    returncv2.cvtColor(np.array(image_pil), cv2.COLOR_RGB2BGR)
# mediapipe 초기 설정
mp_face =mp.solutions.face_mesh
face_mesh =mp_face.FaceMesh(min_detection_confidence=0.5, min_tracking_confidence=0.5)
mp_drawing =mp.solutions.drawing_utils
cap =cv2.VideoCapture(0)
screen_width, screen_height =pyautogui.size()
prev_x, prev_y =0, 0
# 눈 감지 관련 변수
eyes_closed =False
time_eyes_closed =0
font_path ="C:/Windows/Fonts/malgun.ttf"  # 여기에 사용할 한글 폰트의 경로를 지정하세요.
try:
    whilecap.isOpened():
success, image =cap.read()
        if notsuccess:
            print("Ignoring empty camera frame.")
            continue
image_rgb =cv2.cvtColor(image, cv2.COLOR_BGR2RGB)
results =face_mesh.process(image_rgb)
        ifresults.multi_face_landmarks:
            forlandmarks inresults.multi_face_landmarks:
left_eye_top =(landmarks.landmark[159].x, landmarks.landmark[159].y)
left_eye_bottom =(landmarks.landmark[145].x, landmarks.landmark[145].y)
right_eye_top =(landmarks.landmark[386].x, landmarks.landmark[386].y)
right_eye_bottom =(landmarks.landmark[374].x, landmarks.landmark[374].y)
left_eye_distance =abs(left_eye_top[1] -left_eye_bottom[1])
right_eye_distance =abs(right_eye_top[1] -right_eye_bottom[1])
                ifleft_eye_distance <0.02 andright_eye_distance <0.02:
                    if noteyes_closed:
eyes_closed =True
time_eyes_closed =time.time()
                else:
                    ifeyes_closed andtime.time() -time_eyes_closed >0.3:
pyautogui.doubleClick()
image =draw_korean_text(image, "눈 깜빡임 마우스 클릭", (50, 50), font_path, 30, (0, 255, 0))
eyes_closed =False
x =int(landmarks.landmark[4].x *image.shape[1])
y =int(landmarks.landmark[4].y *image.shape[0])
                ifprev_x andprev_y:
diff_x =-prev_x
diff_y =-prev_y
pyautogui.move(diff_x*3, diff_y*3)
image =draw_korean_text(image, "AI 얼굴 방향 마우스 인식중..", (50, 100), font_path, 30, (0, 0, 255))
prev_x, prev_y =x, y
mp_drawing.draw_landmarks(image, landmarks, mp_face.FACEMESH_TESSELATION, landmark_drawing_spec=mp_drawing.DrawingSpec(color=(0, 0, 255)))
cv2.imshow('MediaPipe FaceMesh', image)
        ifcv2.waitKey(5) &0xFF ==27:
            break
finally:
cap.release()
cv2.destroyAllWindows()
동영상 서비스가 종료되어 해당 콘텐츠를 재생할 수 없습니다.
5. 노션 기록 및 프로젝트 공유
노션 기록물 안내
1) 미디어파이프 구동 기본 코드
2) 미디어파이프 기본 코드 구동 파이썬 환경 구축 과정 정리
3) gpt와 함께 미디어파이프 동작 최적화 되어 가는 과정
4) 미디어파이프 최종 동작 화면 캡쳐 및 최종 코드
(심화) 나만의 미디어파이프 활용 인공지능 프로젝트
노션 기본 사용법
[2주차] 노션, 줌잇 사용법 안내
1. 노션이란 무엇인가? https://www.youtube.com/results?search_query=%EB%85%B8%EC%85%98 노션회원가입하기 구글에서 노션 검색 후 회원가입하기 : 본인 편한 아이디로 가입 2. 노션 기초 실습 https://takeheed.tistory.co
pythonkorea.com
끝.
@성원경
'Python > 파이썬 프로젝트' 카테고리의 다른 글
| [파이썬 미니 프로젝트] Pyautogui로 미로찾기 게임 수행하기 (0) | 2023.08.21 |
|---|---|
| 인공지능 오픈소스 모델 소스 원천과 활용 방안에 대한 정리 (1) | 2023.07.20 |
| 페어코딩으로 짝꿍과 함께 파이썬 게임제작 (feat. Live Share, git) (0) | 2023.07.19 |
| VSCode(Visual Studio Code) 사용법 - 파이썬/깃허브/아나콘다 연동 (0) | 2023.07.18 |
| 파이썬 API 활용의 기초 2 - 나이스 OPEN API 활용 (0) | 2023.07.13 |


